In today’s fast-paced digital environment, businesses increasingly turn to Progressive Web Apps (PWAs) to streamline service delivery. With Esper’s platform, you can easily deploy web apps via the Google Play Store, ensuring fast delivery and managed deployment across your fleet. In this post, we’ll walk you through the steps to manage and publish web apps in the Google Play Store. By the end of this article, you’ll understand how to give users a near-native experience with all the simplicity and flexibility that web-based versions offer.
What Are Web Apps?
Web apps run on web browsers, eliminating the need for installation on individual devices. They are built using standard web technologies like HTML, CSS, and JavaScript, making them accessible from any device with internet access and a compatible browser. This cross-platform compatibility ensures that users have a consistent experience regardless of the device or operating system they use.
Web apps are hosted on servers and delivered over the internet, so updates and maintenance are managed centrally. This allows for instant deployment of new features or fixes without requiring users to download updates manually. The ease of access and maintenance makes web apps an efficient solution for both developers and users.
Why Choose Web Apps?
Web apps are a cost-effective alternative to traditional native apps. Whether you want to create internal tools or customer-facing services, web apps offer a flexible, scalable solution. By publishing them through Esper and the Google Play Store, you gain access to simplified deployment and fleet-wide management. This means you can effortlessly roll out updates, monitor performance, and manage permissions across all devices in your network.
Example: Streamlining Retail Operations
Consider a retail company that needs an inventory management system accessible to all its store locations. Developing a native app would require separate versions for different operating systems and individual installations on each device. Instead, the company opts for a web app that employees can access via a browser on any device.
By deploying this web app through Esper, the company can:
- Simplify Deployment: Instantly roll out the app to all store devices without manual installation.
- Centralize Management: Monitor app performance and usage analytics from a single dashboard.
- Ensure Consistency: Provide the same user experience across all devices, reducing training time and errors.
- Reduce Costs: Save on development and maintenance expenses associated with native apps.
This approach not only streamlines operations but also enhances the flexibility to scale as the company grows.
Benefits of Managing Web Apps with Esper
Centralized Management
With Esper’s platform, you can manage web apps alongside native apps, simplifying the deployment process across your entire fleet.
Flexible Display Options
The three available display modes let you customize how your web app appears to users, whether for a fully immersive experience or a lightweight browser-based app.
Fast Updates and Deployment
Esper’s cloud-based platform ensures that deploying and updating web apps across devices is seamless and immediate.
Support for Non-GMS Devices
If you have devices that do not support Google Mobile Services (non-GMS devices), Esper can help you build a web app that can be deployed without dependency on Google. This allows you to extend your applications to a broader range of devices, ensuring that all users can access your services, regardless of their device capabilities.
By leveraging Esper's expertise, you can create and deploy web apps tailored for non-GMS devices while maintaining the same level of functionality and user experience. This flexibility ensures that your business operations are not hindered by hardware limitations or software restrictions.
💡Please reach out to your account manager or Support team if you would like assistance with deploying web apps on non-GMS devices.
How to Publish Web Apps with Esper
Publishing web apps with Esper is incredibly easy and straightforward. Here’s a quick outline of how.
Step 1: Access the Web App Management Section
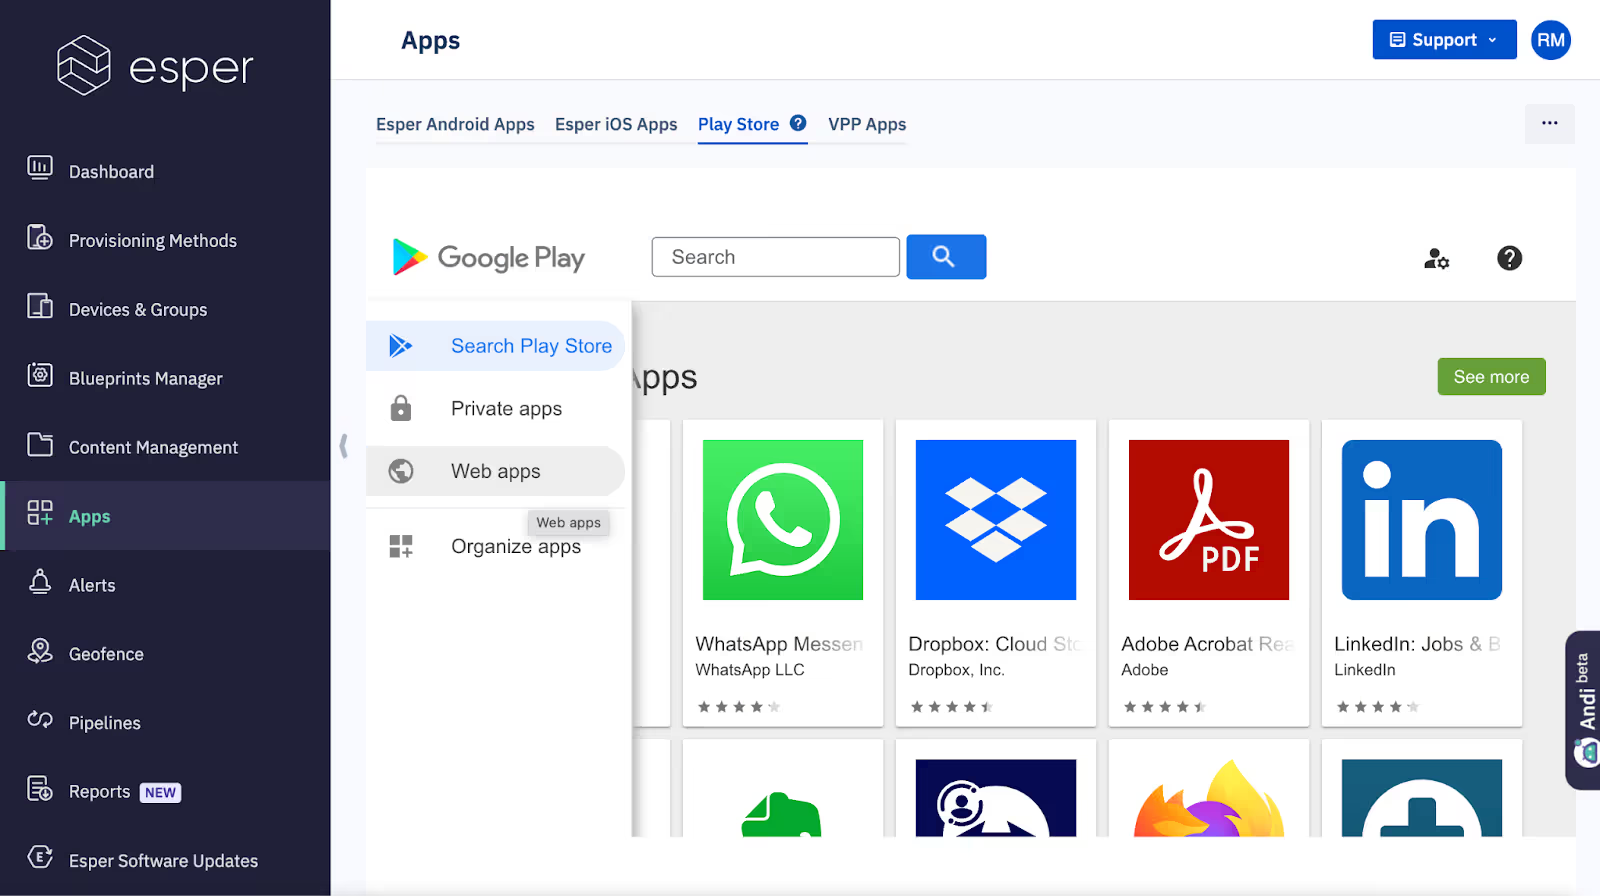
After logging into your Esper dashboard, navigate to the Apps section in the left-side menu. From there, you can manage Android, iOS, Play Store apps, and more. To add a web app, click the Play Store tab, followed by Web Apps.

Step 2: Fill in the Key App Details
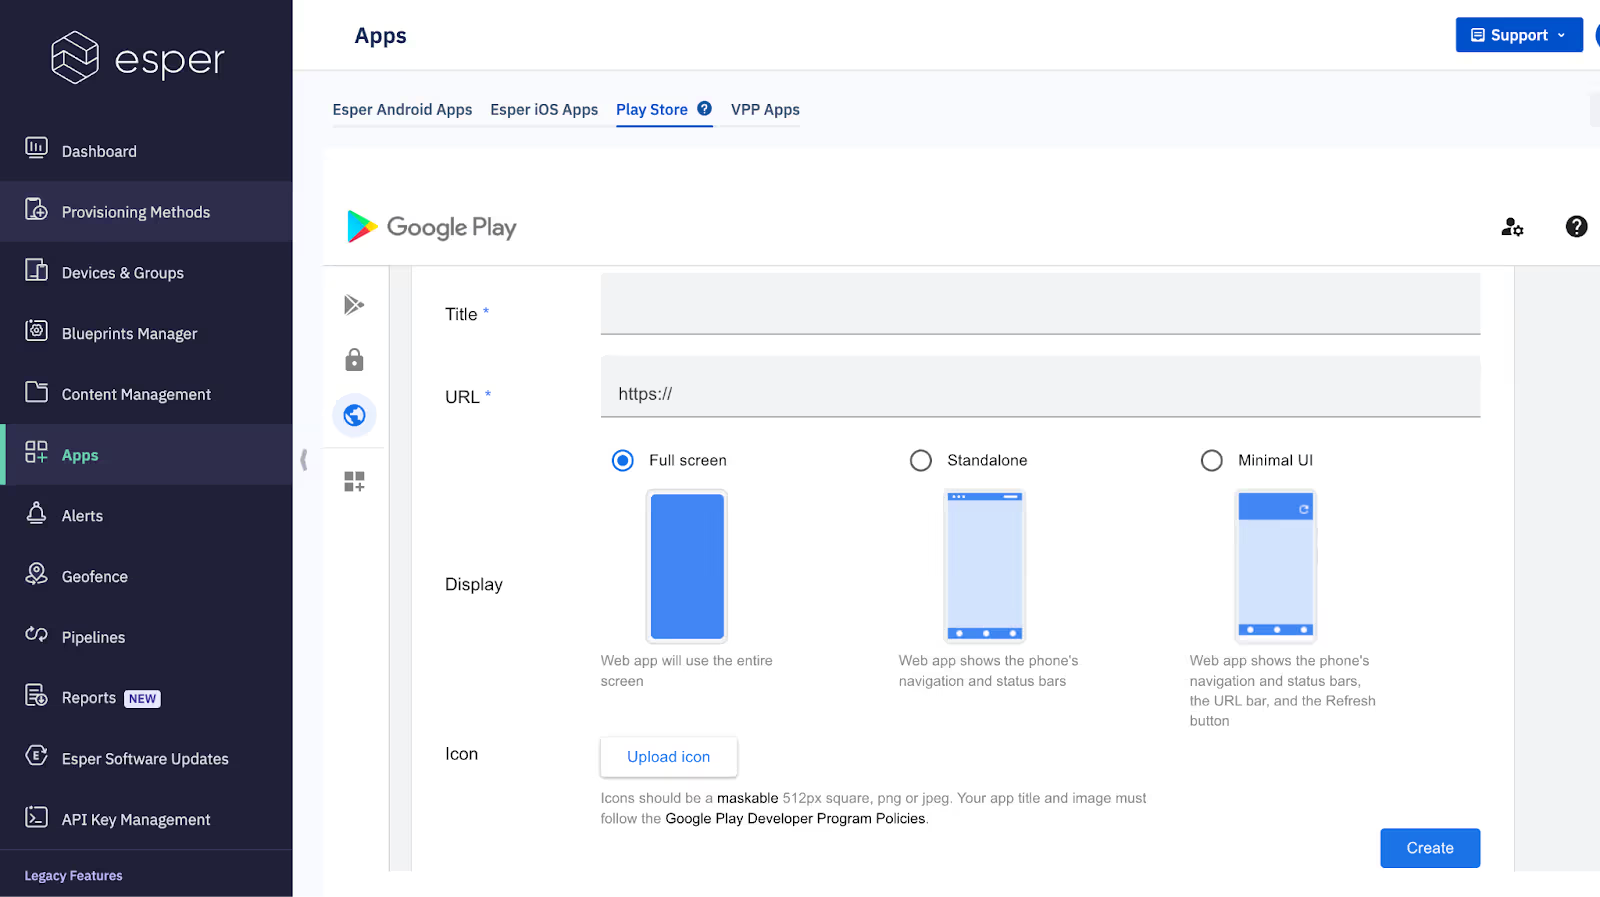
You’ll be prompted to fill out basic details such as:
- Title: The name that will be displayed in the Play Store.
- URL: The HTTPS-secured link for your web app.
Make sure the URL is properly formatted for web app access.
Proper URL Formatting for Web App Access
- Start with the Correct Protocol:
- Use https:// to ensure a secure connection.
- Example: https://
- Include the Full Domain Name:
- This consists of the subdomain (if any), domain name, and top-level domain.
- Example: https://www.example.com
- Add the Path to Your Web App:
- If your web app is not located at the root of your domain, include the path.
- Example: https://www.example.com/mywebapp
- Include Any Necessary Parameters:
- If your web app requires query parameters, append them at the end.
- Example: https://www.example.com/mywebapp?user=123
Step 3: Choose the Display Mode
Esper offers three distinct display modes for your web app:
- Full Screen
- Offers a fully immersive experience without any browser UI. The app looks and feels like a native app.
- Standalone
- A hybrid option that retains the phone’s navigation and status bars while hiding browser controls, providing a near-native experience.
- Minimal UI
- Displays basic browser elements like the URL bar and refresh button, offering a simplified web-browsing experience.

Step 4: Web App Icon
If you want to add a custom icon for your Web App, you can upload a maskable 512px square, png or jpeg. Your app title and image must follow the Google Play Developer Program Policies.
Press the "Upload Icon" button and select your image which follows the above requirements.
Step 5: Save and Publish
After entering the app details and selecting the appropriate display mode, click Create to publish your web app. Esper handles the creation and after a few minutes will be published and available for deployment to your devices by adding to your blueprint. See our web apps Help Center article for more information.
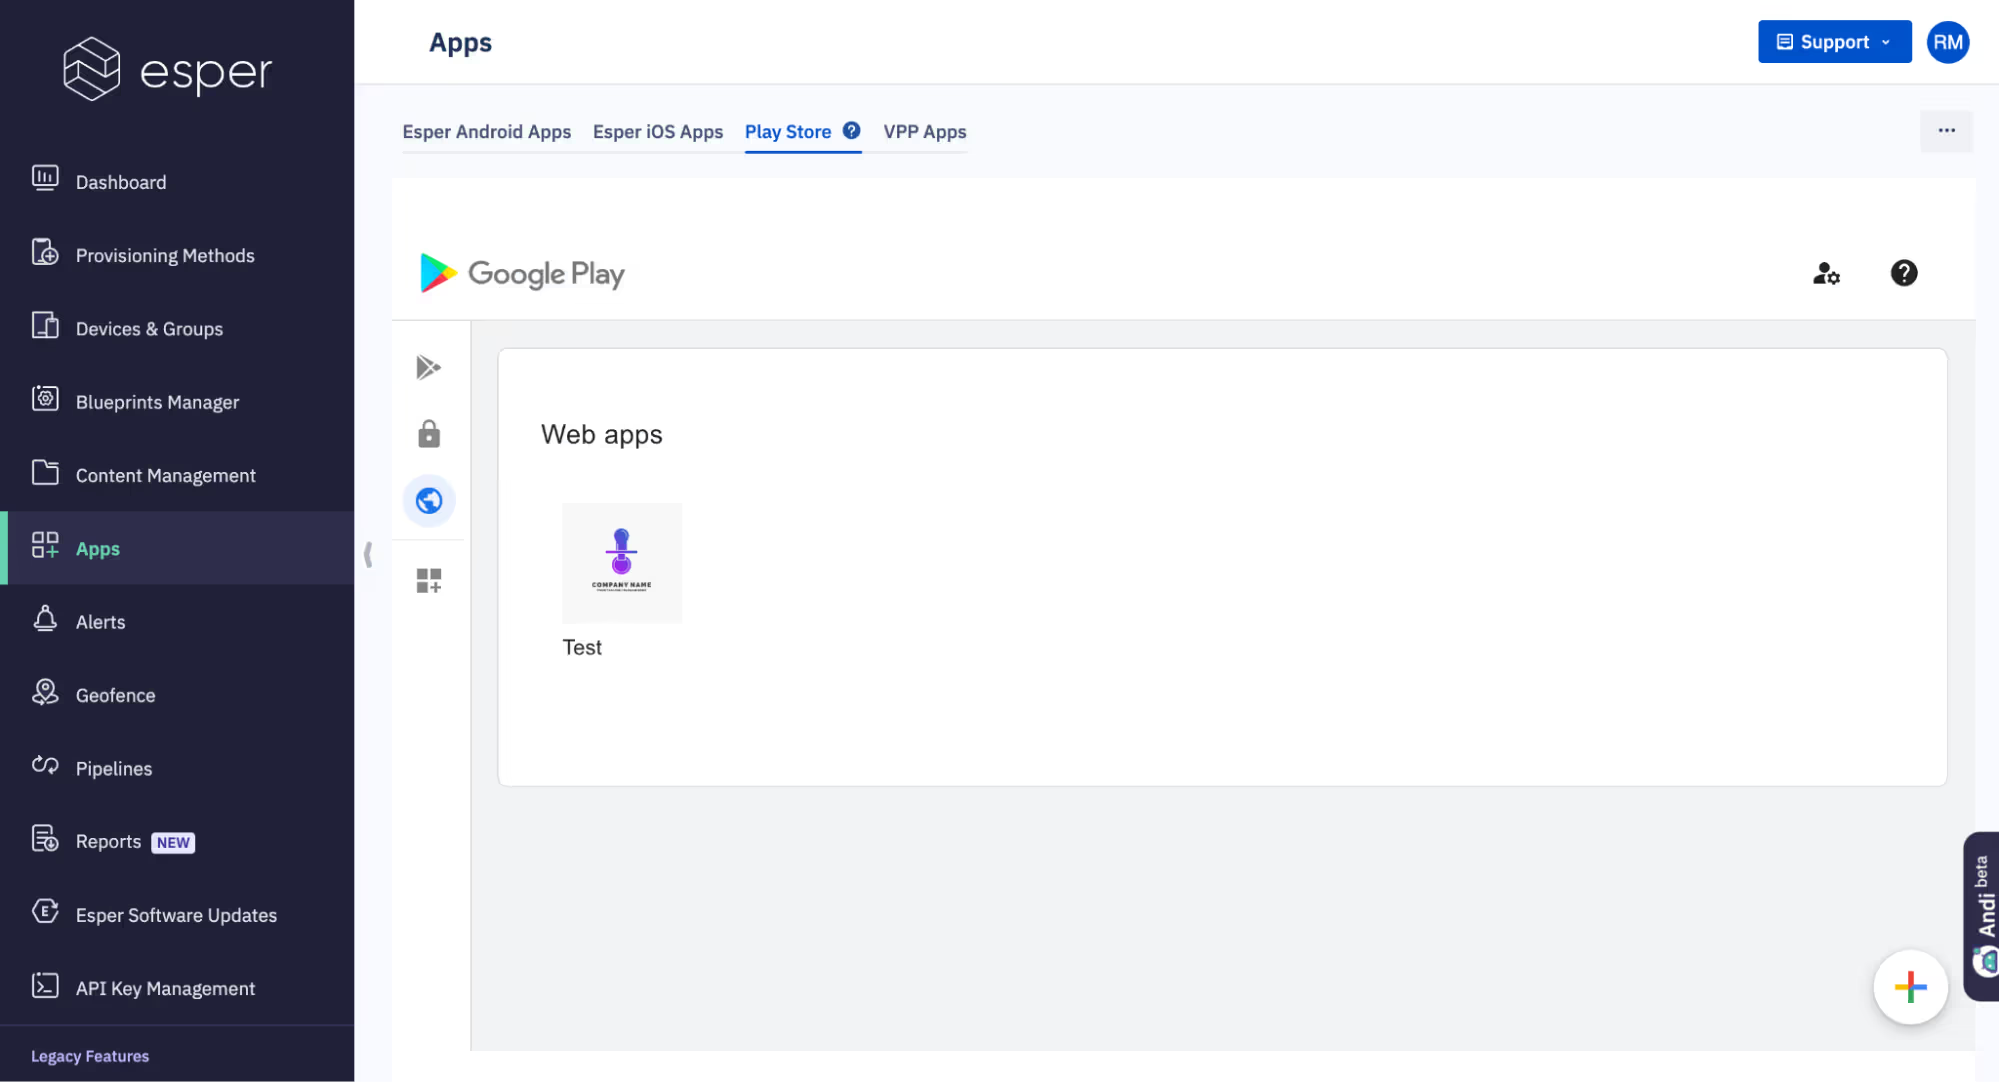
Once published, the web app is listed in the Web Apps section of the Play Store tab in your Esper dashboard. From there, you can manage updates, monitor usage, and ensure compliance across all enrolled devices.

Conclusion
Web apps provide a streamlined, flexible way to deploy versatile web applications to your devices. With Esper, you gain the added advantage of simplified deployment, management, and customization options, ensuring your apps reach users in the best possible way. Whether you're building immersive apps or simple tools, Esper makes sure you’re equipped to handle the modern web app landscape.
FAQ
Keep Exploring


