Google has stringent requirements for licensing GMS for devices targeting consumer use cases. One of those strict requirements is including a camera. This enables a common provisioning method supported by Android Enterprise called 6-tap QR code, which Esper supports as an Android Enterprise partner.
The 6-tap method is simple: upon first boot on the welcome screen, tap on any non-active area of the screen six times, and a QR code reader will appear. Use Esper to generate the QR code for the Blueprint you want to use to provision your device, snap it using the device’s camera, and away you go! Easy.
Many vertical market devices that use Google Mobile Services (GMS) lack cameras. If your device doesn't have a camera, what can you do? Hint: Ensure you have the device’s serial number or IMEI in hand.
Google's Zero-Touch Enrollment is great for some devices, but not everyone uses it. Also, using it just to test a few phones can be a bit much since it's really meant for big deployments.
You can also provision the device using ADB, which Esper makes even easier via our Esper Device Provisioner (EDP). But this requires a PC or Mac with EDP installed. Given that USB ports that are ADB enabled are often hidden away purposely to protect the device during deployment, it may take some time to locate the correct USB port on the device. Note that Esper allows you to configure the behavior of such USB ports to protect from undesired intrusion into a device via ADB. You can also use adb over Wi-Fi or Ethernet, but not all customers are interested in going that route to give it a go with Esper.
That’s where the old school, trusty Android Enterprise enrollment method (formerly called Android for Work, or AfW) comes into play.
The Android Enterprise provisioning method requires you to go through the standard Android setup wizard steps to the Google Account login screen. This means you have to enter the required Wi-Fi credentials to get internet connectivity. Unlike 6-tap QR code, which includes the Wi-Fi credentials in the QR code, you have to do the manual setup here. Unfortunately, You can’t skip any of the standard Google or OEM setup requirements before you get to the Google Account login screen.
But once you get there, if you enter “afw#esper” as the Google Account name, it will then push you into Esper device enrollment.
If you don’t follow the steps below beforehand, you’ll again be presented with the QR code reader on the device, which, of course, won’t work without a camera. One way around this is to plug in a USB camera into the device and use it to snap the QR code generated by Esper. But there’s a better way.
Here’s what you can do instead: Use our Seamless Provisioning option! You start by doing what you would normally do in Esper: create a Blueprint defining the desired state of the device you wish to provision — policy, settings, and apps all in one place.
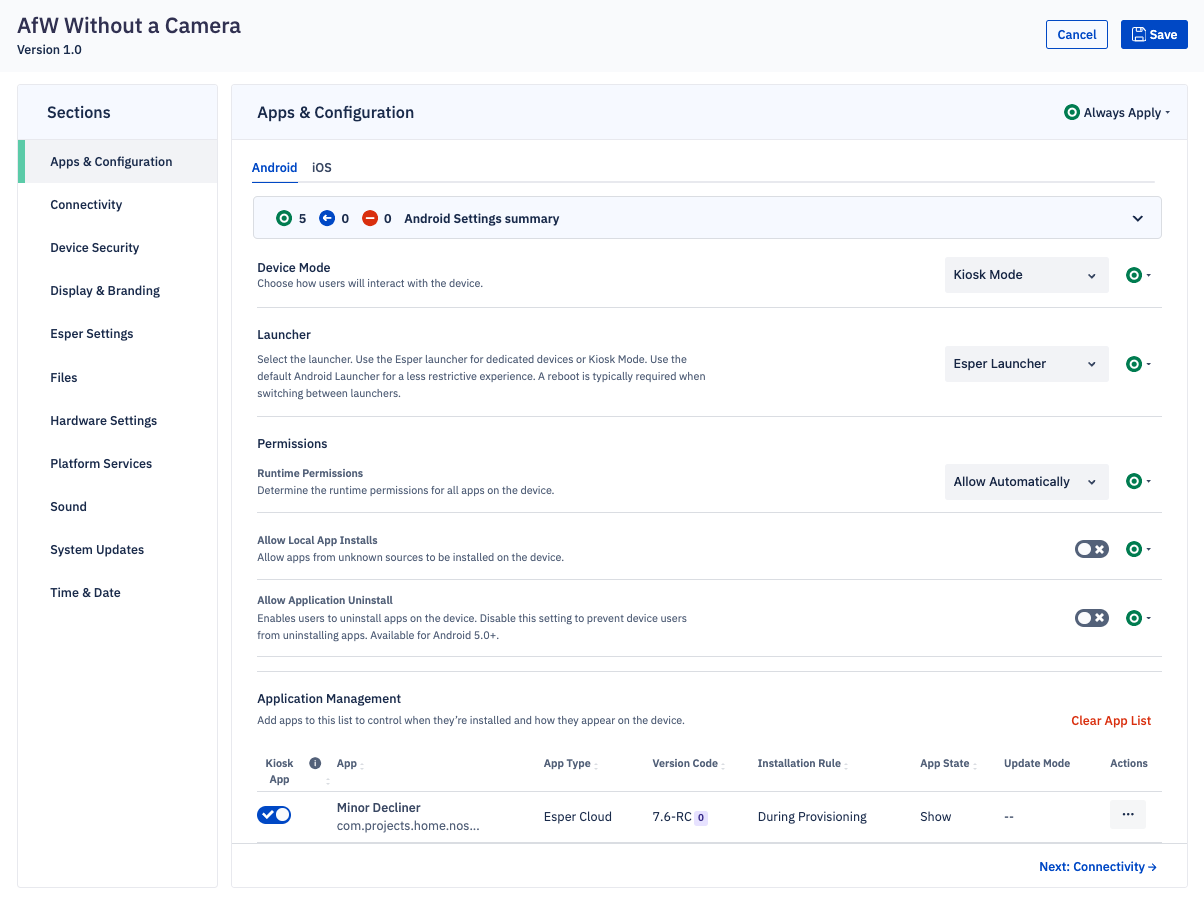
Once you’ve saved your Blueprint, apply the appropriate group setting (if applicable).
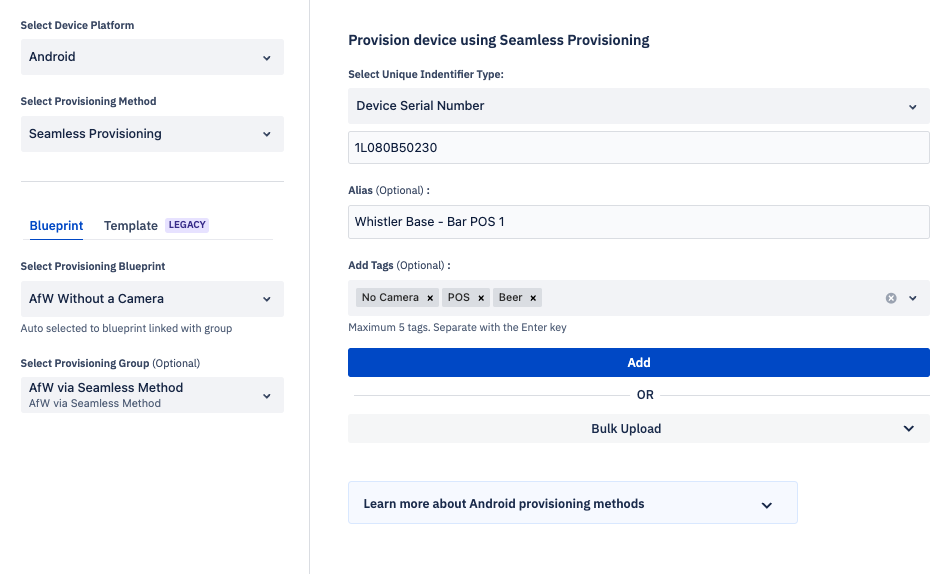
Now comes the trick! In the Esper console, go to Provisioning Methods and choose Seamless Provisioning. You’ll be presented with a screen where you’ll select the Blueprint to use for provisioning and the group where you’d like to place the provisioned device. Make your choices here, and then manually enter the serial number (or IMEI 1 or IMEI 2 of the device, if that’s the identifier you want to use) along with an alias and/or tags to assign to the device if you wish to do so (not required).
If you are using a serial number, be sure to enter it precisely (e.g., don’t mistake an O for a 0). Once you’ve uploaded this to the Esper infrastructure, we are now aware of the linkage of this specific device to your tenant and the Blueprint you’ve assigned to it for onboarding.
With this ready, grab your device, and on the first boot go through the setup wizard (if you haven’t already). Connect the device to the Internet and take care of the setup steps until you get to the Google Account login screen. Enter “afw#esper” for the account number. When Google’s servers connect with Esper’s, we use the link you created via Seamless Provisioning to apply that Blueprint from your tenant to provision the device.
That’s it! No camera, no ADB — just a smooth way to onboard a vertical-market-specific, cameraless GMS device onto Esper.
And if you need to onboard these types of devices at scale, you can upload a CSV with the serial numbers, aliases, and tags for each device using the same method. But if you want to try out a single GMS device without a camera, the Android Enterprise (AKA Android for Work) method is an easy way to do it.
FAQ
Keep Exploring